Houseplant · Bromeliaceae
Bromeliad
Bromeliaceae (family)
Keep the cup full and the light bright but indirect, and a bromeliad rewards you with months of color.
Bright indirect
Every 7–14 days
55–81°F · 13–27°C
USDA 10–11
Overview
Bromeliads come from the tropics, prized for their long-held color and a rosette of stiff leaves that funnels rain into a central cup. The kinds sold for the home are mostly epiphytes, plants that grip onto trees in the wild rather than dig into soil. That perching habit shapes the whole plant: the loose, airy mix it sits in, and the way it drinks from the leafy cup at its center rather than through the roots.
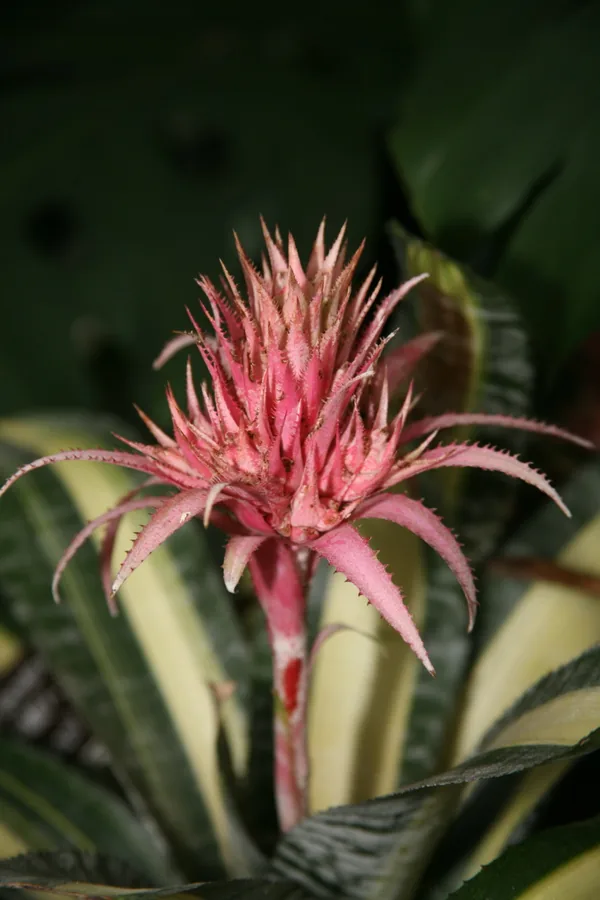
The colorful crown most people take for a flower is really a spike of bracts, modified leaves that hold their red, orange, or pink for months on end, far longer than any true petal would. A rosette opens like this only once. Afterward it winds down by degrees, but first it raises a ring of pups around its base, so one plant becomes several as the seasons turn.
These are easygoing plants, kind to a first-time grower. Warmth, bright indirect light, and fresh water standing in the cup are nearly all they ask. The fastest way to kill one is to overdo the water, leaving it pooled where the crown and roots cannot shake it off.
Care
The short version: stand it in bright indirect light, in a loose fast-draining mix, in warm and humid air. Keep fresh low-mineral water sitting in the central cup, and tip that cup empty weekly so it stays clean. Touch the mix with water only after its surface has gone dry.
Light
Set a bromeliad in bright but indirect light, the soft glow beside a window rather than the glare on the sill. It will carry on in medium light or light shade, though the leaf color goes flat there. The hard midday beam bleaches and scorches the surface, so keep the rosette clear of it.
Water
The leafy center cup is how these plants take most of their water. Hold about 2 to 3 cm of fresh, low-mineral water in it, rainwater or distilled where you can manage it, and tip it out weekly so it never sours. Wet the mix only once the top few cm have dried, since the roots turn to rot fast when left sitting wet.
Soil
Plant into a loose, fast-draining epiphytic mix of bark, perlite, and coarse peat, the kind packaged for orchids. A faintly acidic pH of 5.0 to 6.0 suits the roots. Plain potting soil clings to far too much water and will rot them out.
Temperature
These tropical plants sit happiest between 55°F and 81°F (13°C to 27°C), ordinary indoor warmth. Keep the rosette away from cold drafts and from the chill of a winter windowpane.
Humidity
Bromeliads want air at 50% to 70%, damper than most rooms hold. Cluster plants close, stand the pot over a pebble tray, or run a humidifier to raise it. Air that runs too dry writes itself in brown, crisp leaf tips.
Feeding
Feed monthly through spring and summer with a balanced water-soluble fertilizer cut to a quarter or half strength, worked into the mix or misted on as a thin foliar spray. Never tip strong fertilizer into the cup, where it can scorch the crown.
Pruning
Strip off the dead or browning outer leaves at the base, and cut away the spent flower spike once its color drops. The flowered mother rosette sinks slowly over many months, and you can take it out whole after you have lifted its pups.
Repotting
Bromeliads seldom need a new pot, usually only every 2 to 3 years or when an established pup is ready to move up. Repot when the plant tips over with little nudging, when the mix has crumbled and stays soggy, or when roots start to push out past the rim.
Size & spacing
Most stand 12 to 35 inches (30 to 90 cm) tall with a spread of 12 to 24 inches (30 to 60 cm), by genus. Leave enough room around each one that air moves freely through the rosette.
Troubleshooting
Almost every bromeliad problem comes down to water and light, and it surfaces first in the cup, along the leaf tips, or in the fading of color. Spot it early and the cure is plain. Find the symptom that matches your plant below, then move before rot or scorch takes hold.
A center gone **soft and sour** while the rosette caves inward
When the core turns to mush and the whole rosette slumps, you are looking at crown or base rot. It takes hold where water has gone stale in the cup or where the mix stays wet and never dries between drinks. Tip out the cup and rinse it clean, let the mix dry right through, and shift the plant into a chunky, fast-draining medium if water lingers. Should the central crown be past saving, lift off any firm, healthy pups and grow those on instead.
Fix:
- Empty and flush the central cup, then refill with fresh water
- Allow the potting mix to dry and improve drainage or repot into a coarse, fast-draining mix
- Salvage healthy pups if the mother crown is rotted beyond recovery
Washed-out leaves with **bleached, scorched patches** on the sunny side
Harsh direct sun drains the color from the leaf surface and burns the spots that face it head on, and a quick jump into a much brighter window makes it worse. What these plants crave is bright but indirect light. Pull the rosette back from the fierce midday beam, then walk it toward any sunnier perch across a week or two so the leaves can toughen to it.
Fix:
- Move to bright but indirect light
- Acclimate gradually to brighter positions
Crisp **brown tips** on leaves that are firm and colored everywhere else
Tips that dry to a brittle brown point to thin, dry air or a slow crust of minerals and salts left behind by hard or fluoridated water. Lift the air to 50% to 70% with a pebble tray, a humidifier, or a cluster of plants drawn close together, and pour rainwater or distilled water into both the cup and the mix. Color will not flow back into a browned tip, so snip the dead ends off only if the look bothers you.
Fix:
- Raise humidity (grouping, pebble tray, or room humidifier)
- Switch to rainwater or distilled water for the cup and mix
- Trim crispy tips for appearance only
A strong **green rosette** that simply refuses to throw a spike
A bromeliad opens its bract only after the rosette has grown to full size, and when a mature plant stays plain green the cause is most often too little light. Set it in a bright, indirect spot and let the months pass. To nudge a full-grown rosette along, shut it inside a clear bag alongside a ripe apple for a few days, because the ethylene drifting off the fruit can coax the central bract into forming.
Fix:
- Increase light to bright indirect levels
- Be patient until the rosette reaches mature size
- Optionally encourage bloom by enclosing the plant with a ripe apple for a few days to expose it to ethylene
Toxicity
Easy news for a full household: the bromeliads grown indoors are non-toxic to cats, dogs, and people, so the plant can sit wherever the light suits it. What deserves a second look is the leaf margin. Some genera, Aechmea among them, wear stiff, toothed edges sharp enough to nick a finger or a curious paw.
Safe for
People · Cats · Dogs · Horses · Rabbits · Livestock · Birds
Cats None
The bromeliads grown as houseplants carry no toxin for a cat, so a stolen nibble does no harm inside. The single thing to mind is the fine toothed edge on leaves of types like Aechmea, which can nick a paw or a probing nose.
Dogs None
A dog can live alongside these bromeliads with no danger of poisoning. A persistent chewer might catch a scratch on the stiffer, spine-edged kinds, yet the leaf itself holds nothing harmful.
Horses Safe
Nothing in these leaves would trouble a horse. They live indoors and seldom come within a horse's reach in the first place.
Rabbits Safe
A rabbit that chews a leaf meets no poison in the common bromeliads. The stiff, fibrous foliage makes a poor mouthful and acts more like a chew-toy than food.
Livestock Safe
The widely grown bromeliads hold no toxin that would reach cattle, goats, or sheep.
Birds Safe
Pet birds sit safely beside these plants, with nothing harmful in either the leaves or the colored bracts.
People Safe
Fine to keep in any room of the house. The only caution is the sharp, toothed leaf margin on certain genera, so handle those with care.
Some bromeliads have stiff or finely toothed leaf edges; handle with care to avoid skin scratches.
Varieties
Bromeliad is a vast family, yet a small set of genera fills most homes and shop benches. These are the distinct shapes and colors worth recognizing on sight.
Guzmania
Slender, strap-shaped green leaves sweep upward around a tall, lasting spike of bracts in fiery red, orange, or yellow.
Aechmea (urn plant)
Wide, rigid leaves carry silver cross-banding and toothed edges, crowned by a pink flower head that holds for months.
Neoregelia (blushing bromeliad)
It skips the tall spike entirely: the flat, open rosette burns red or pink at its very center as flowering nears.
Vriesea (flaming sword)
Banded or mottled leaves spread beneath a flattened, sword-shaped bract that earns the plant its common name.
Billbergia (queen's tears)
A narrow, tubular rosette throws out arching, hanging flower spikes that flash a brief but striking show before fading.
How to propagate
There is rarely a need to buy a second bromeliad, since each plant offers up new ones for free as it finishes flowering.
Offsets & pupsEasy
After flowering, once pups reach about one-third to one-half the size of the mother plant · Several weeks to a few months to root and establish
Bromeliads make more of themselves through pups, the little offsets that push up at the base once the mother has flowered. Let a pup grow to about a third or half the size of its parent and put out a few roots of its own, then slice or gently twist it away. Settle it into a loose, fast-draining bromeliad or orchid mix, hold it lightly moist with the cup kept filled, and it will take root and find its feet over several weeks to a few months.
Myths
A bromeliad is dead and worthless once it flowers.
Each mother rosette flowers a single time and then eases into a slow decline, yet that is hardly the finish. As it fades it pushes up offsets, the pups, around its base, and every pup matures into its own plant that will bloom in its turn. One flowering is the opening of the next generation, not an ending.
You should only ever pour water into the cup and never water the soil.
Fresh water in the central cup matters, but the roots take a drink too, so wet the mix once its surface has gone dry. The cup itself needs emptying often, because water left standing sours and eats away at the crown from the middle out. Look after both the cup and the mix, and keep the cup water fresh.