Bulb · Iridaceae
Dutch Iris
Iris × hollandica
Plant the bulbs in fall and Dutch iris lifts tall, sleek blooms on straight stems the next spring.
Full sun
Every 5–7 days
USDA 6–9
15–24 in · 38–61 cm
Overview
Dutch iris is a slim, upright plant whose narrow blue-green leaves stand nearly vertical, each blade folded into a shallow channel that runs its length. From a true bulb rather than a creeping rhizome, it pushes a single smooth, round stem straight up, and that stem carries one flower at its tip. Beside the broad, blunt fans of bearded iris, the whole plant looks lean and sharp-edged.
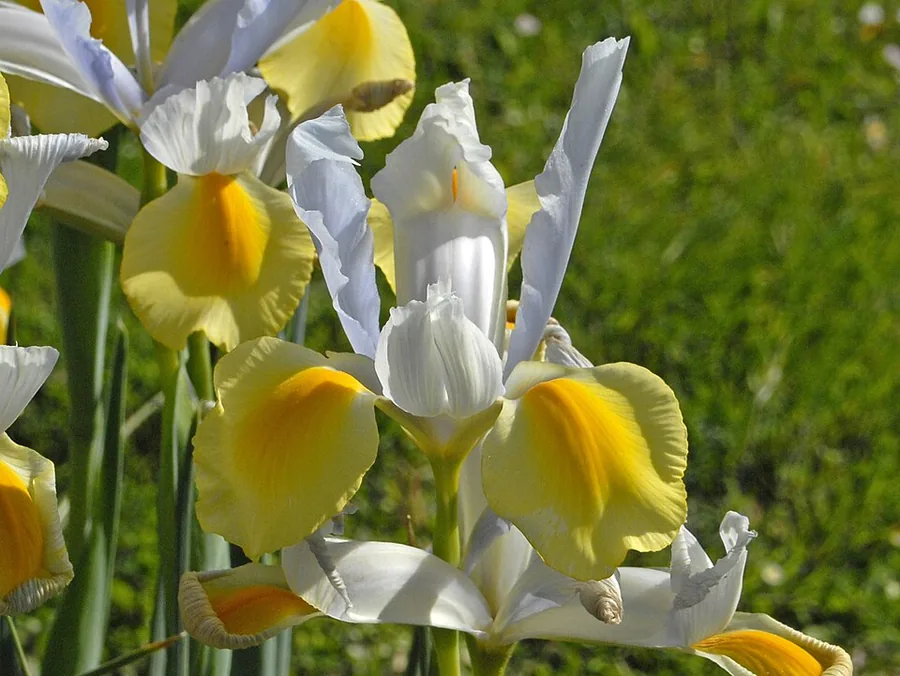
The flower itself is the classic iris shape in miniature: three upright petals, the standards, ringed by three outer petals, the falls, that flare out and dip down. A contrasting blotch often sits on each fall like a painted thumbprint. The color is saturated and clean, running from deep violet-blue through white and yellow, and the petals have a thin, almost silky substance that catches light along their edges.
Below the soil sits a firm, rounded bulb wrapped in a papery skin, and it spends winter there before the leaves emerge. Bloom comes mid to late spring, after which the blades yellow and soften and the bulb pulls back into a dry summer rest. The stems are long and straight enough to cut, holding the single flower well clear of the foliage.
Care
The short version: full sun and fast-draining soil, even moisture through the spring growing season, and a dry rest once the blue-green blades yellow in summer.
Light
Plant Dutch iris in full sun for the stiffest, straightest stems and the fullest flowers. It tolerates a little afternoon shade in hot regions, but in too much shade the blades stretch, the stems lean, and the plant holds back its bloom.
Water
Keep the soil evenly moist through spring while the blades lengthen and the flower opens, watering roughly every 5 to 7 days in dry spells. Once the flower fades and the leaves yellow, ease off and let the bulb dry out for its summer rest.
Soil
Drainage is everything for that fleshy bulb. Use sandy loam or any average soil that drains fast, since a bulb left in wet ground turns soft and rots. Heavy, sticky clay is the main thing to avoid.
Temperature
The plant takes a wide range, from about 39°F to 86°F (4°C to 30°C). The bulb needs a cold winter to set the bud hidden inside it, then mild spring weather draws the stem and flower up.
Humidity
Ordinary outdoor air suits Dutch iris, so there is no humidity target to hit. Airflow matters more than moisture in the air, since crowded, damp blades collect the spots that mar their clean blue-green.
Feeding
Work a balanced bulb fertilizer into the soil at planting in fall, then feed again in early spring as the first blades break ground. That is all the feeding the bulb needs across the season.
Pruning
Leave the blades standing after the flower fades, even as they slacken and pale, because that is how the bulb recharges for next year. Cut the leaves only once they have yellowed and died back, and snip off the spent flower at its stem.
Repotting
Dutch iris asks for renewal more than repotting. Lift and divide the clumps every few years after bloom when the flowers shrink, or simply plant fresh bulbs each fall, since the old ones are short-lived.
Size & spacing
Expect slender plants reaching 15 to 24 inches (38 to 61 cm) tall on a narrow base of just 3 to 6 inches (8 to 15 cm) across. The upright, ribbon-like blades and thin footprint let you slot them into tight gaps or pack them into close drifts.
When to plant
Dutch iris runs on a fall-to-spring rhythm. The firm, rounded bulbs go into the soil in autumn, around October to November, settling before the cold. The narrow blades and single-flowered stems push up to bloom from mid to late spring. After the flowers fade, the foliage yellows and the bulb draws back for a dry summer.
Northern hemisphere
Southern hemisphere
Typical months for a temperate climate: start earlier in warm zones, later where spring frosts linger.
- Plant: Plant bulbs in fall, roughly October to November, 3-6 inches deep
- Harvest: Mid to late spring, April to June
Hardiness
USDA hardiness zones: 6–9
Temperature: down to -23°C
Troubleshooting
Most Dutch iris trouble shows itself either on the strappy blue-green blades or down in the firm white bulb. Catch it early and the rest of the planting usually pulls through. Match the look below to what is in front of you, then act before it spreads through the bed.
Soft, sour rot where the leaf bases meet the bulb
Where firm white flesh should be, bulb rot leaves a yellow, water-soaked smear that smells sour to the nose. It almost always traces back to soil that holds water, whether from waterlogged ground or watering on through the summer rest. Lift the bulbs and press each one: the sound bulbs stay firm and dry, while the spoiled ones give like wet pulp. Replant only the firm ones in a gritty, sandy bed that drains fast.
Fix:
- Discard affected bulbs
- Replant healthy firm bulbs in a sandy, well-drained site
- Withhold water once foliage has died back for dormancy
Hollowed bulbs and stems that wilt and fold
Split a damaged bulb and the iris borer shows itself: a fat larva at the end of a hollow tunnel chewed through the white flesh and up into the stem. Bulb mites and narcissus bulb fly maggots leave the same mined, papery cavities behind. Above ground, the leaves lose their stiffness and the whole plant folds at the base. Destroy any tunneled bulb, rake out the dead foliage these grubs hide in, and set firm, clean bulbs in their place.
Fix:
- Remove and destroy infested bulbs and larvae
- Clean up plant debris where pests overwinter
- Replant clean, firm bulbs
Spotted blades or mottled, distorted growth
Small, sharp-edged spots scattered across the blue-green blades point to fungal leaf spot, which sets in where the leaves stay wet too long. A blurred, light-and-dark mottling that comes with stunted, twisted blades reads differently and signals mosaic virus, which aphids carry from plant to plant. Strip the spotted leaves, water down at the soil so the blades dry, and dig out any mottled, virus-struck plant before it spreads.
Fix:
- Remove affected leaves
- Improve air circulation and avoid overhead watering
- Destroy virus-infected plants and control aphids
Toxicity
Dutch iris is toxic, and the firm bulb under the soil is the dangerous part. It holds irisin and terpenoids that bring on drooling, vomiting, and diarrhea in cats, dogs, horses, and other animals that chew the blades or bulb. No part of the plant is food, so keep the bulbs away from pets and children, and wear gloves when you handle them.
Toxic to
Cats · Dogs · Horses · Rabbits · Livestock · Birds · People
Cats Mild
A cat that shreds a blade or noses a bulb out of the soil drools and vomits soon after. Loose stools and a flat, sluggish mood follow, and the firm white bulb is the part that hits it hardest.
Dogs Mild
A dog that gnaws a dug-up bulb drools in long strings, turns queasy, and gets diarrhea. It stays tired and listless until the upset clears.
Horses Mild
A horse that grazes the strappy leaves or the roots drools, goes off its feed, and develops diarrhea. The terpenoids in the plant leave it dull and uncomfortable.
Rabbits Mild
The same irisin and terpenoids upset a rabbit's gut, bringing on drool and loose droppings. Keep the bulbs and the green blades well clear of any run or hutch.
Livestock Mild
Cattle, goats, and sheep mostly leave the upright iris foliage alone, but a hungry animal that crops it gets a sore stomach and the runs. Fence off any beds near a paddock.
Birds Caution
Little is recorded about birds eating iris, so the safe read is a likely irritant rather than a known safe plant. Keep pet birds away from the bulbs to be sure.
People Caution
No part of this plant is meant to be eaten, and the bulb in particular can cause stomach upset if swallowed. The clear sap can irritate skin, so wear gloves and keep children away from the bulbs.
Wear gloves when handling bulbs, and wash hands after to avoid skin irritation from the sap.
Helpline numbers

United States
ASPCA Animal Poison Control: (888) 426-4435 (fee applies)
Poison Control: (800) 222-1222



Canada
Poison Centres: 1-844-764-7669
Varieties
Dutch iris comes in a clear set of named colors, and a few cultivars, told apart by petal color and the markings on their falls, turn up again and again in catalogs and bouquets.
Blue Magic
A popular cultivar whose deep violet-blue petals hold their saturated color well once cut for the vase.
Casablanca
Carries large white flowers, each fall brushed with a single yellow blotch.
Symphony
Sets crisp white standards upright above clear yellow falls for a sharp two-tone bloom.
How to propagate
Dutch iris is easiest to start from firm bought bulbs, though you can also split the pale offsets from an established clump or, with patience, grow it from seed.
Bulbs & cormsEasy
Plant bulbs in fall, October to November · Blooms the following spring after fall planting
The simplest route is to push firm, rounded bulbs into the soil in autumn, around October to November, and let them flower the next spring. Each one is a true bulb rather than a rhizome, and because the bulbs are short-lived, many gardeners simply buy and plant fresh ones every fall.
DivisionEasy
After bloom, when foliage yellows in summer · Offset bulblets take several years to reach flowering size
Once the blades yellow in summer, lift a clump and twist off the little pale offset bulblets crowded against the parent bulb, then replant them. It costs nothing, but those tiny offsets take several years to grow big enough to flower.
SeedModerate
Sow ripe seed · Several years to reach flowering size
Ripe seed will sprout, but it is the slow road and rarely worth it. The seedlings need several years to reach blooming size, and because the named hybrids don't come true, the flowers won't match the parent's color or markings.
Myths
Dutch iris grows from a rhizome like bearded and Siberian iris.
Dig one up and the difference is plain: Dutch iris grows from a rounded true bulb that buds off small offset bulblets, not the thick, knuckled rhizome that creeps along the surface on bearded or Siberian iris. You plant the bulbs in fall, like daffodils, rather than seating a rhizome at the soil line in summer.