
Introduction
If you want a flower that returns bigger every spring and asks almost nothing of you, the bearded iris is hard to beat. It is one of the easiest long-lived perennials a beginner can grow. It gives you tall, ruffled blooms in nearly every color you can name. Plant it once and you get years of flowers, plus clumps you can split and share with friends.
These plants have earned their reputation. Botanists know them as Iris germanica, and they have been a cottage-garden staple for generations. They are a true hardy perennial, tough enough to survive USDA Zones 3 to 10 according to Penn State Extension. Once they settle in, they shrug off drought and deer browse the leaves far less than they bother most garden plants.
Here is the part new gardeners miss. Bearded iris grow from rhizomes, not true bulbs, and that one fact changes how you plant them. Think of the rhizome like a sunbather that wants its back exposed to the light. You leave the top sitting at or just below the soil surface, never buried deep. The first iris I planted went in too deep, and the rhizome turned soft and rotted by midsummer. Planting too deep is the single most common beginner mistake, and it leads straight to rot.
This guide on growing bearded iris answers the hard questions too. You get the basics every source agrees on, like full sun and well-drained soil. Then you get plain answers on iris borer, bacterial soft rot, winter prep, coffee grounds, and what not to plant nearby. Let's start where every healthy iris begins, with the right spot in your garden.
How to Grow Bearded Iris
Late one summer eight years ago I tucked three white 'Immortality' iris into a sunny bed by the gravel path. They went in fast, almost as an afterthought. The tops sat bare in the sun. Every May since, that same clump pushes up clean white blooms. I never lift a finger for it.
Learning how to grow bearded iris comes down to a short list you can memorize in a minute. The plant wants full sun, sharp drainage, and a rhizome that sits high and dry. Get those three right and the rest is small stuff. This is one of the most forgiving perennials you can put in the ground.
Good bearded iris care starts with the site. Pick a spot that gets at least 6 hours of direct sun each day. Deep shade often gives you leaves and no flowers. The soil needs to drain well, with a slightly acidic pH near 6.8. Space plants 12 to 24 inches (30 to 60 cm) apart so air moves between the fans.
Here is the part that trips up new growers. Bearded iris does not grow from a bulb. It grows from a rhizome, a thick stem that creeps along the soil surface and stores energy for next year's bloom. That stored energy is why planting depth matters so much, and why the top of the rhizome should stay exposed to the sun rather than buried.
Bearded iris suits a beginner because it asks for so little. It is hardy across USDA Zones 3 to 10. It shrugs off dry spells once the roots settle. After bloom it needs only a light feeding of low-nitrogen 5-10-10 fertilizer. Skip the high-nitrogen kind, which pushes soft growth and rot.
Over the years a single plant spreads into a slow clump you can lift, split, and hand off to a neighbor. That habit made it a classic pass-along plant long before garden centers existed. Plant it in well-drained soil with plenty of sun and it will outlive most of what you put beside it.
Garden irises are hardy, long-lived perennials that need a minimum of care.
Planting and Soil Setup
Two rhizomes I tucked into a low, damp corner of a south-facing bed turned mushy and foul by the next spring. The rest of that same row, set on the high side where water ran off fast, pushed up fat fans and bloomed on schedule. Same sun, same soil, same day in the ground. Only the drainage was different, and the soggy corner rotted out.
That is the whole game with planting bearded iris. Get the site and the depth right and these plants almost grow themselves. The single most important thing you can give them is well-drained soil, because the rhizome sits at the surface and rots fast when it stays wet.
Timing matters too. The best window for when to plant bearded iris runs from July through September, at least 4 to 6 weeks before your first hard freeze. That gives the roots time to settle in before winter. The steps below walk you through site choice, soil prep, the mound trick, and backfilling.
Pick a spot with at least 6 hours of direct sun and fast drainage, since deep shade and wet ground both lead to poor blooms and rot.
Loosen the bed and work in organic matter, adding gypsum to heavy clay so water drains freely away from the rhizomes.
Form a low mound of soil in the planting hole so the rhizome can sit on top while the roots drape down the sides into the trench.
Place the rhizome with its top at or just below the surface and exposed to the sun, spacing plants 12 to 24 inches (30 to 60 cm) apart.
Firm soil over the roots only, leave the rhizome top showing, then water once to settle the soil and let the bed dry between waterings.
Your soil decides the exact bearded iris planting depth. In light, sandy soil you can set the rhizome about 2 inches (5 cm) deep. In medium soil, place it just below the surface. In heavy clay, set it slightly above grade. The wetter and heavier the ground, the higher you plant. In every case the rhizome top exposed to the air and sun is what keeps rot away.
Iris like a slightly acidic soil pH near 6.8, and a quick soil test before you plant is the surest way to know where you stand. If you garden in heavy clay, work in organic matter and a bit of gypsum to break it up so water drains off instead of pooling. Loose, fast-draining ground does more for these plants than any fertilizer ever will.
Planting too deep is the single most common reason bearded iris fail to bloom; keep the top of the rhizome at or just below the surface where it can bake in the sun.
Sun, Water and Feeding
Your bearded iris ask for less than most perennials, but they care a lot about three things. Give them full sun, water them on the dry side, and feed them light. Get that trio right and the rest takes care of itself.
Plant your iris where they catch 6 to 8 hours of direct sun a day. In deep shade they throw plenty of green leaves and almost no flowers. A southern, open spot is your safest pick, and the moving air there keeps the foliage dry.
Watering bearded iris trips up new growers more than anything else. These are drought tolerant plants once their roots settle in, so soggy soil does far more harm than a dry spell. Wait until the top 3 inches (8 cm) of soil feel dry, then soak the bed and walk away.
Think of it as wet feet and dry knees. The roots reach down for moisture while the rhizome stays dry on top, right at the surface where rot cannot get a hold. Leave the ground wet all the time and you end up with a mushy, foul-smelling rhizome.
Sunlight Needs
- Hours: Bearded iris need at least 6 hours of direct sun each day, with 6 to 8 hours of full sun giving the strongest, most reliable bloom.
- Shade warning: In deep shade the plants grow leaves but produce few or no flowers, so a southern, open exposure is the safest choice.
- Air flow: An open sunny site also keeps foliage dry and improves air circulation, which lowers the risk of leaf spot and rot.
Watering Approach
- Frequency: Water deeply but infrequently, waiting until the top 3 inches (8 cm) of soil dry out before watering again.
- Drought tolerance: Once established, bearded iris handle dry spells well, so they rarely need extra water outside of long droughts.
- Overwatering: Constantly wet soil is one of the most common ways gardeners accidentally rot the rhizomes, so let the bed dry between waterings.
Fertilizing Routine
- Formula: Use a low-nitrogen fertilizer such as 5-10-10, applying about one quarter cup around each clump rather than directly on the rhizome.
- Timing: Feed lightly in early spring and again after flowering to support next year's blooms without forcing soft growth.
- Avoid: Skip high-nitrogen lawn feeds and feed-and-weed products, which push lush growth that invites bacterial soft rot.
Soil And Drainage
- Texture: Bearded iris demand well-drained soil and prefer a slightly acidic pH near 6.8, so amend heavy clay with organic matter and gypsum.
- Mounded beds: In wet sites, raised or mounded beds keep the rhizomes from sitting in water, which is the surest way to prevent rot.
- Testing: A simple soil test before planting confirms drainage and pH so you can correct problems before the rhizomes go in the ground.
Fertilizing bearded iris is where good intentions go wrong. You want to feed heavy for bigger blooms, but a low nitrogen fertilizer is what these plants crave. Reach for a 5-10-10 blend and scatter about a quarter cup around each clump. Keep it off the rhizome itself.
Feed your iris twice. Give them a light meal in early spring and another once the flowers fade. That second one builds next year's blooms without pushing soft, weak growth. Skip the high-nitrogen lawn feeds and the combination feed-and-weed products, because both invite bacterial soft rot. If you want a gentle extra, a handful of salt-free alfalfa pellets does the job.
A high nitrogen fertilizer may cause the plants to grow too rapidly and lead to soft rot.
Dividing and Spreading
One clump of deep purple Superstition iris filled its whole corner of my south-facing bed. Over the years I handed dozens of divisions across the fence to my neighbors. The summer it bloomed badly, I dug it up and found the center too crowded to flower. I split it, replanted the firm young pieces, and still had a bucket of healthy rhizomes to give away.
That is how generously these plants multiply, which is why dividing bearded iris belongs in your routine. Bearded iris spread slowly outward as the rhizomes branch year after year. The old center stops blooming while the young edges keep growing, so the clump turns into a dense ring with a dead middle.
Knowing when to divide bearded iris is simple once you watch for the signs. Most clumps need dividing every 3 to 5 years, and the best window is July or August after the plants finish flowering. Iris planted closer than 12 inches (30 cm) crowd faster and need splitting every 2 to 3 years instead.
There is more than bloom at stake here. A packed clump traps moisture between the rhizomes, and that damp, still air raises the risk of soft rot and other disease. Dividing opens the planting back up and gives each piece room to breathe.
How to divide bearded iris comes down to good rhizome selection and clean cuts. Keep firm, light-colored rhizomes that run at least 3 inches (8 cm) long, each with healthy roots and a fan of 4 to 5 leaves. Toss the old leafless center, and sanitize your knife in a 10% bleach solution between plants so you do not spread infection. Work through the steps below.
In July or August, dig the whole clump and lift it gently so the rhizomes and roots come up with as little damage as possible.
Keep firm, light-colored rhizomes at least 3 inches (8 cm) long with healthy roots and a fan of 4 to 5 leaves, and discard the old center.
Separate divisions with a clean knife, sanitizing the blade in a 10% bleach solution between plants to avoid spreading disease.
Cut the leaf fans back to about one third their height so the divisions can settle without losing too much water through the foliage.
Reset the divisions on mounds 12 to 24 inches (30 to 60 cm) apart with tops exposed, expecting sparse bloom the first year and full bloom by year two.
When you finish transplanting bearded iris, expect a quiet first spring. The fresh divisions root in before they flower, so bloom stays sparse the first year and returns in full by the second year. That short wait pays off with a far healthier planting.
This is also the cheapest way to grow your collection. Every division you keep is a free new plant, and the extras make easy gifts. Once you see how fast does bearded iris spread play out in your own beds, you will have plenty to share.
Bearded irises should be divided every three to five years, as the plants quickly become overcrowded and don't bloom well.
Pests, Diseases and Problems
Most bearded iris problems start small and stay easy to fix once you know what you are looking at. The plant is tough and long lived, but it is not pest proof, and a few troubles can wreck a clump if you ignore them.
Two issues do the real damage. The iris borer harms iris more than any other bug. And bacterial soft rot is the worst iris disease you will face. Your nose and eyes catch both early, so learn the warning signs now.
Borer trouble shows up as sawdust-like frass near the base. You will also see wet streaks running down the leaves. Soft rot is even easier to spot. The rhizome turns mushy and gives off a foul smell you will never forget.
The list below pairs each symptom with the right fix. It covers iris leaf spot, the aphid-spread mosaic virus, and what animal will eat irises in your beds.
Iris Borer
- Symptoms: Look for sawdust-like frass, water-soaked streaks on leaves, and tunneled, hollowed rhizomes in late summer.
- Why it matters: The iris borer causes more damage to iris than all other insects and opens wounds that let soft rot follow.
- Control: Remove and destroy infested rhizomes, clear old foliage in fall to kill overwintering eggs, and keep beds clean and open.
Bacterial Soft Rot
- Symptoms: Affected rhizomes turn soft, mushy, and slimy with an unmistakable foul smell, often after wet weather or borer damage.
- Why it matters: Soft rot is the most destructive iris disease and can spread quickly through a crowded, poorly drained clump.
- Control: Cut away all rotted tissue or remove the rhizome, then bag and trash it rather than composting, and improve drainage and spacing.
Leaf Spot And Mosaic
- Symptoms: Leaf spot shows as brown spots with darker margins on foliage, while aphid-spread iris mosaic causes mottled, streaked leaves.
- Why it matters: Iris mosaic is the most widespread iris disease, and heavy leaf spot weakens the plant and reduces next year's bloom.
- Control: Remove and destroy spotted leaves, improve air circulation with proper spacing, and manage aphids to limit mosaic spread.
Animals And Few Flowers
- Symptoms: Nibbled foliage or disturbed roots can point to rabbits or voles, while a clump that stops blooming is usually overcrowded or too deep.
- Why it matters: Iris are deer resistant but not pest proof, and crowding or deep planting are the leading reasons for a lack of flowers.
- Control: Protect young plants from rabbits and voles, divide crowded clumps, and reset shallow rhizomes that were planted too deep.
A rhizome with bacterial soft rot smells absolutely awful; bag it and put it in the trash rather than the compost pile so the bacteria do not spread back to your beds.
Pests are not always the reason for a bearded iris not blooming. More often the clump is just too crowded or planted too deep. Divide it every few years and keep the top of each rhizome at the surface.
Good habits beat almost every problem before it starts. Give your iris full sun, space the rhizomes well, and keep their tops dry, and you will rarely reach for a knife or a trash bag again.
Cutting Back and Winter Care
Once the May and June show ends, your plants still have work to do, and so do you. The big jobs are simple: stop the spent flowers from setting seed, and then handle fall cleanup before the cold sets in. Get the timing right and your clumps come back stronger each spring.
Knowing when to cut back iris trips up a lot of new gardeners. The short answer is that cutting back bearded iris happens in two stages. You snap off the bloom stalks right after flowers fade, then trim the leaves down in early fall. Hold off on hacking the green leaves in summer, because they are still feeding next year's flowers.
Here is the cause and effect that makes this click. Leave a spent stalk on the plant and it pours energy into making seeds instead of fattening the rhizome. Pull each stalk off and that energy goes back underground where next year's bloom is built. Skip your fall cleanup and the dead leaf litter becomes the exact spot where borers and disease wait out winter.
The timeline below maps the full year so you always know the next task at hand.
Spring
Pull back any winter mulch as growth starts, feed lightly with 5-10-10, and watch for early leaf spot on emerging foliage.
Late Spring To Early Summer
Enjoy the May and June bloom, then snap off each spent flower stalk so the plant stores energy in the rhizome instead of seeds.
Mid To Late Summer
This is the window to divide crowded clumps and to feed again after flowering while the roots can still establish before winter.
Early Fall
Cut foliage back to 6 to 8 inches, clear fallen leaves and debris, and destroy any borer-damaged or diseased material.
Winter
In cold northern zones, mulch with straw or evergreen boughs after the ground freezes, then remove it as soon as growth resumes in spring.
Trimming iris foliage to 6 to 8 inches in fall, including October, is perfectly fine and helps remove borer eggs; just avoid hard-cutting green, healthy leaves in midsummer.
Most of your bearded iris winter care is just that early fall trim and a good sweep of fallen leaves. Cut the foliage to 6 to 8 inches, then clear and toss any borer-chewed or diseased pieces rather than composting them. That single step removes most of the borer eggs and spores that would carry trouble into spring.
How much you do to prepare bearded iris for winter depends on where you garden. Established plants in mild zones often need no protection at all, and a heavy cover can do more harm than good. In cold northern zones, wait until the ground freezes, then lay down winter mulch like straw or evergreen boughs. Pull it off as soon as growth resumes so the rhizomes do not sit wet and rot.
Gardeners in the coldest reaches of Zone 3 may mulch every year, even on settled clumps. Match the effort to your climate and these tough perennials will hand you another round of blooms next May.
Varieties and Garden Uses
Most guides treat all bearded iris varieties as one plant. But they split into clear height classes, and each class fits a different spot in your yard. Penn State Extension sorts them by size. The tall bearded iris are the giants, and they stand 28 to 38 inches (71 to 97 cm) tall at the back of a border.
The flower shape stays the same across every class, so once you can read it you can shop with ease. The upright petals are the standards. The petals that drape down are the falls. The fuzzy strip running along each fall is the beard. Picture those three parts and any catalog photo makes sense to you.
Color is where it gets fun for you. Iris color patterns even have their own names. You'll see plicata with stippled edges, amoena with white tops over colored falls, and bicolor blends. Each flower lasts 3 to 5 days. One stalk can carry 1 to 12 blooms that open in turn over a couple of weeks.
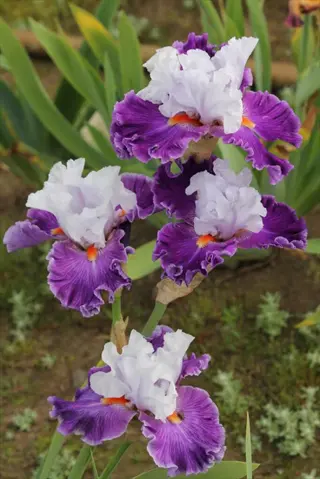
Tall Bearded Iris
- Height: Tall bearded iris reach about 28 to 38 inches (71 to 97 cm), making them the dramatic back-of-border choice most gardeners picture.
- Bloom: They flower in May and June, with each bloom lasting 3 to 5 days and a single stalk carrying as many as 1 to 12 flowers.
- Color: They come in nearly every color and in named patterns such as plicata, amoena, and bicolor for striking contrast.
- Use: Plant them where their height shows above shorter perennials in a sunny, well-drained mixed border or cottage garden.
- Care: They follow the same easy routine as all bearded iris, needing full sun, lean soil, and dividing every few years.
- Best for: Gardeners who want the classic, fragrant, large-flowered iris look that defines late-spring borders.
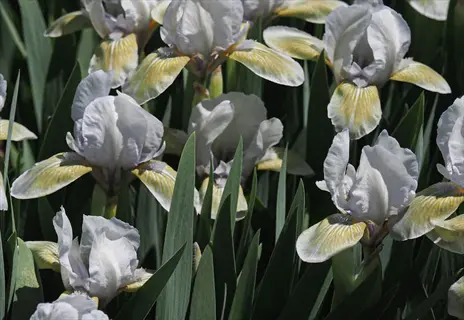
Dwarf Bearded Iris
- Height: Dwarf bearded iris stay compact at roughly 4 to 9 inches (10 to 23 cm), perfect for the front of a bed or a rock garden.
- Bloom: They are the earliest to flower, opening as early as March, since shorter iris generally bloom before taller ones.
- Color: Despite their small size they offer the same rich range of colors and patterns as their tall relatives.
- Use: Tuck them along path edges, in rock gardens, or at the front of borders where taller iris would hide them.
- Care: Their needs match other bearded iris, with full sun, good drainage, and the same low-nitrogen feeding.
- Best for: Gardeners wanting early spring color and a neat, low edging plant that returns reliably.
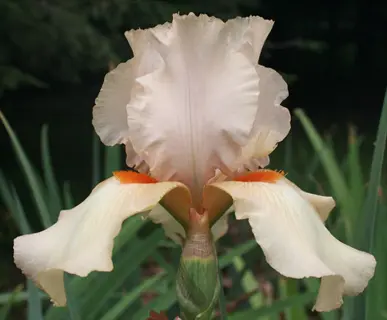
Reblooming Bearded Iris
- Height: Rebloomers come in several height classes, so you can find one to fit the front, middle, or back of a border.
- Bloom: Their standout trait is a second flush of flowers later in the season after the main May and June display.
- Color: They offer the full spectrum of iris colors while giving you bloom across more of the year.
- Use: Place them where a late-season repeat show is welcome, such as near a patio or main garden view.
- Care: They appreciate steady, lean feeding and good moisture during their second growth cycle to support reblooming.
- Best for: Gardeners who want more than one bloom period from a single hardy, low-maintenance plant.
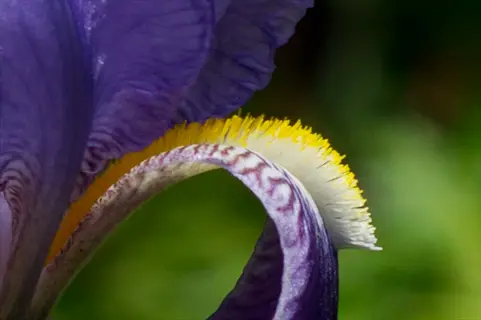
Intermediate And Border Iris
- Height: These mid-size classes sit between dwarf and tall iris, generally around 16 to 27 inches (41 to 69 cm) high.
- Bloom: They flower a little before the tall bearded types, helping bridge the gap from early dwarf iris to the main display.
- Color: Like their relatives they carry the full range of iris colors and named patterns on a sturdier, mid-height stalk.
- Use: They fit the middle of a border beautifully and stand up to wind better than the tallest cultivars.
- Care: Their needs match every bearded iris, with full sun, lean low-nitrogen feeding, and good drainage.
- Best for: Gardeners wanting a wind-resistant, medium-height iris that extends the bloom season in a mixed bed.
All of these classes share the same dry, sunny taste, which makes companion planting simple for you. Bearded iris suit cottage gardens, mixed borders, and even containers when the drainage is good. Your smart move is to surround them with plants that want the same lean, sunny spot.
Airy, sun-loving partners work best for you. Try alliums, salvia, and catmint. They let air move around the iris. They never trap water against the roots. Skip dense ground covers, thirsty plants, and anything that throws shade. Damp soil is the fastest way to rot a rhizome.
Pair bearded iris with airy, sun-loving companions like alliums, salvia, and catmint, and avoid dense, thirsty, or shade-casting plants that hold moisture against the rhizomes.
5 Common Myths
Bearded iris should be planted deep like tulip bulbs so they survive the cold winter and root firmly in the soil.
Iris rhizomes are planted at or just below the surface with the top exposed; planting too deep is a common cause of poor blooming and rot.
Feeding bearded iris a strong high-nitrogen lawn fertilizer makes them grow lush and produce far more flowers each spring.
High nitrogen causes soft, rapid growth that invites bacterial soft rot; a low-nitrogen formula such as 5-10-10 is far safer for healthy blooms.
Bearded iris need frequent watering all summer long, just like most thirsty garden flowers, to keep them blooming well.
Established bearded iris are drought tolerant, and overwatering is a common mistake that rots the rhizomes in soggy soil.
Once you plant bearded iris you can leave the clump alone forever and it will keep blooming heavily every single year.
Clumps become crowded and bloom poorly over time, so dividing every three to five years keeps the plants vigorous and flowering.
Because deer avoid bearded iris, no animal will ever bother them and the plants are completely pest free in any garden.
Iris are deer resistant but not pest free; iris borers tunnel into rhizomes, and rabbits or voles may nibble foliage and roots.
Conclusion
Here is the part that should put you at ease. Bearded iris care comes down to a handful of basics, and once you have them down, the plant does most of the work. Every extension source behind this guide points to the same simple routine, with no tricks and no constant fussing.
Keep the few things that matter front of mind. Give your iris full sun for at least 6 hours a day, and plant it in well-drained soil so the roots never sit wet. Set the rhizome shallow with its top showing, because too deep invites rot. Feed with a low-nitrogen 5-10-10 after bloom, and water deeply but rarely. That is the whole plan.
The one chore worth a note on your calendar is dividing bearded iris every 3 to 5 years. Lift the clump in July or August, keep the firm young rhizomes, and toss the spent center. This single habit keeps your plants blooming strong instead of fading into a crowded, flowerless tangle.
Do those things and a single planting pays you back for years. Bearded iris is a hardy perennial that returns and multiplies on its own. That is why gardeners pass clumps over the fence to friends and family for generations. Growing bearded iris really is that forgiving.
I planted a few rhizomes from a neighbor's clump years ago, and they still bloom every spring with almost no work from me. Picture your own sunny bed next spring, the fans thickening and the first buds climbing each stalk. By May and June that bed fills with color, and all it asked of you was sun, sharp drainage, and a light hand. Plant a few rhizomes this summer, and your future self will thank you every bloom season.
Glossary
- bacterial soft rot
- A bacterial disease that turns iris rhizomes mushy and foul-smelling, usually in wet soil or after pest damage.
- falls
- The drooping outer petals of an iris flower, each carrying the fuzzy line called the beard.
- frass
- The sawdust-like waste left behind by tunneling insects such as the iris borer, used as a sign of infestation.
- iris borer
- A moth caterpillar that tunnels into iris rhizomes and is the most damaging insect pest of iris.
- iris mosaic
- An aphid-spread virus that causes mottled, streaked iris leaves and is the most widespread iris disease.
- plicata
- An iris color pattern in which a light flower is edged or stitched with a darker contrasting color.
- rhizome
- A thick, horizontal underground stem that stores energy and grows the iris plant, rather than a true bulb.
- standards
- The upright petals at the center of an iris flower, named for their raised, banner-like position.
External Sources
Frequently Asked Questions
Do bearded iris come back every year?
Yes, bearded iris are hardy perennials that return and bloom for many years.
Do bearded irises like sun or shade?
Bearded iris need full sun, at least 6 hours of direct light each day.
Why are bearded iris so expensive?
Newer named hybrids cost more because of the time and labor needed to breed and multiply them.
What are common problems with bearded iris?
The most common problems are:
- Iris borer damage to rhizomes
- Bacterial soft rot from wet soil
- Leaf spot on foliage
- Few flowers from overcrowding
Are coffee grounds good for bearded iris?
Used sparingly in compost they are fine, but heavy direct use can cause problems.
How do you prepare bearded iris for winter?
Cut foliage back, clear debris, and mulch after the ground freezes in cold areas.
Can you grow bearded iris in pots?
Yes, with a wide container, fast-draining soil, full sun, and winter protection.
What month do bearded irises bloom?
Tall bearded iris bloom in May and June; dwarf types start earlier.
What should you not plant next to bearded iris?
Avoid plants that shade the rhizomes or keep the soil constantly wet.
What flower is called the poor man's rose?
The bearded iris is often called the poor man's rose.